RouterOS简单网络配置事例

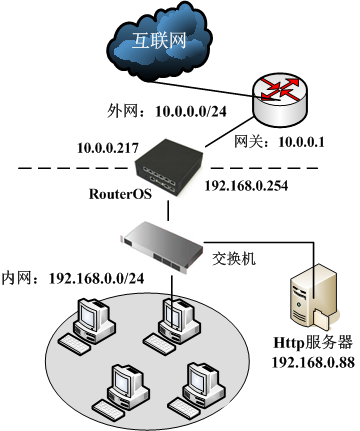
通过下面一个简单的网络拓扑作为配置实例,根据该网络需要通过RouterOS完成配置:
Diagram

Description automatically generated

在当前的实例中我们涉及到两个网络,即接入ISP网络的WAN外网和LAN内网:

  • LAN内网地址段:192.168.0.0/24。路由器的地址在这个网络中为192.168.0.254
  • 接入ISP的外网WAN为10.0.0.0/24。路由器的地址是在网络中为10.0.0.217
  • 外网DNS为61.139.2.69,202.98.68.96

配置RouterOS实现内网访问ISP网络,我们的步骤一共分为五步

  • 首先:启动设备后,检查interface接口网口连接是否正常,并定义网口名称
  • 第二:配置对应网口的IP地址
  • 第三:配置默认网关路由
  • 第四:配置nat地址转换规则
  • 第五:配置DNS服务器

第一步:网络接口配置

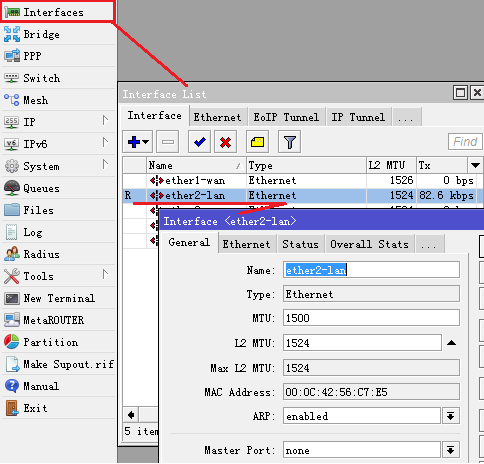
在/interfaces列表中修改ether2为ether2-lan定义为内网接口,如图:
Graphical user interface, application

Description automatically generated

同样将ether2修改为ether2-lan,指定内网接口,同理将ether1也设置为ether1-wan,以此区分接口。

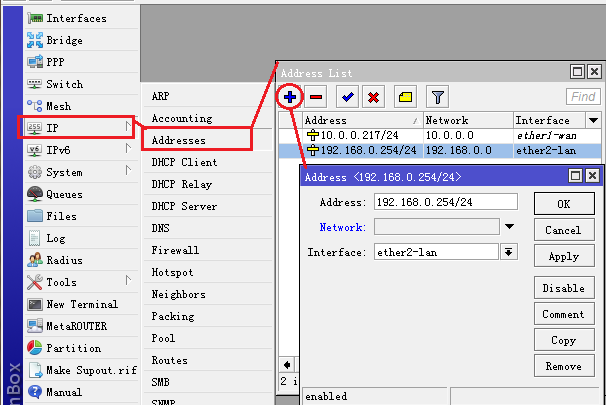
第二步:添加IP地址

在/ip address中添加IP地址和选择网卡接口,添加内网和外围的IP地址如图:
Graphical user interface, application, table, Excel

Description automatically generated

同理在ip address菜单下,添加ether1-wan口的IP地址。

第三步:添加默认网关

在/ip routes里添加默认网关10.0.0.1,开启check-gateway=ping(网关ping监测)如图:

Graphical user interface, text, application, email

Description automatically generated

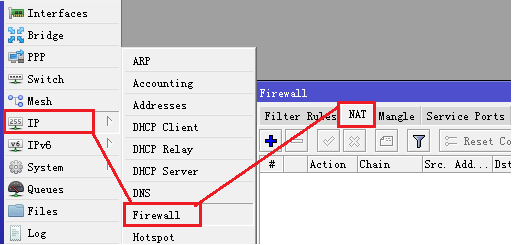
第四步,NAT地址转换

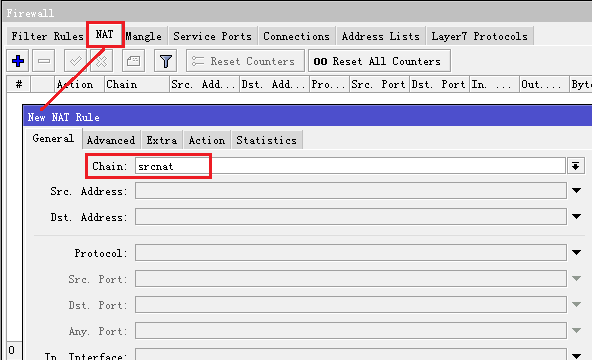
在/ip firewall nat 里点击“+”添加伪装规则:
Graphical user interface, application

Description automatically generated

在NAT里添加新的规则,在chain里选择srcnat链表:

Graphical user interface, text, application, email

Description automatically generated

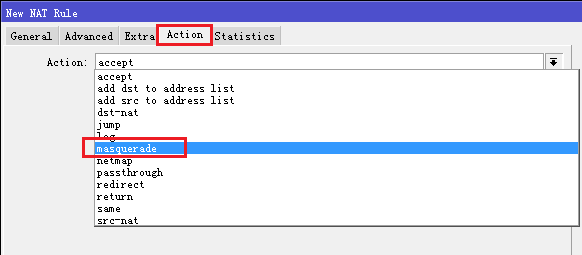
在选择action里的action=masquerade规则:

Graphical user interface, text, application, email

Description automatically generated

添加完成后:

Table

Description automatically generated

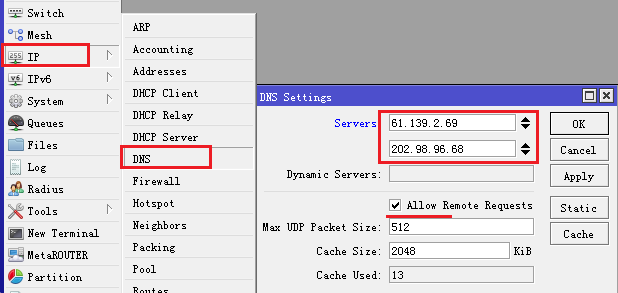
第五步,DNS配置

在/ip dns的settings中添加多个DNS服务器地址,根据需要启用DNS缓存(allow remote requests),并能通过Cache size修改DNS缓存大小:
Graphical user interface

Description automatically generated

到此,上述的单在线网事例就已经配置完成!

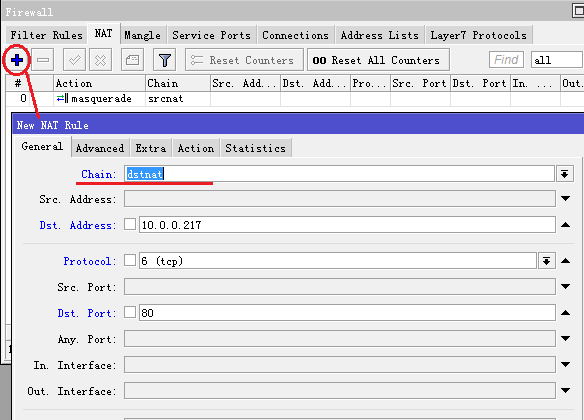
端口映射

根据以上网络拓扑,需要将内网的http服务器发布到外网,内网的http服务器IP地址192.168.0.88,这里需要做端口映射规则,进入ip firewall nat里,选择chain=dstnat,我们的外网IP地址是10.0.0.217配置到dst-address,dst-port为tcp协议80端口,如下图
Graphical user interface, application

Description automatically generated

在action选择dst-nat操作,to-address设置内网http服务器IP地址,和端口80

Graphical user interface, text, application, email

Description automatically generated

Graphical user interface, text, application, email

Description automatically generated

主机带宽控制

进入Queue添加带宽控制规则,选择simple queue,添加主机IP是192.168.0.3,并取名为IP03,设置带宽为上行(upload)1m,下行(download)2m
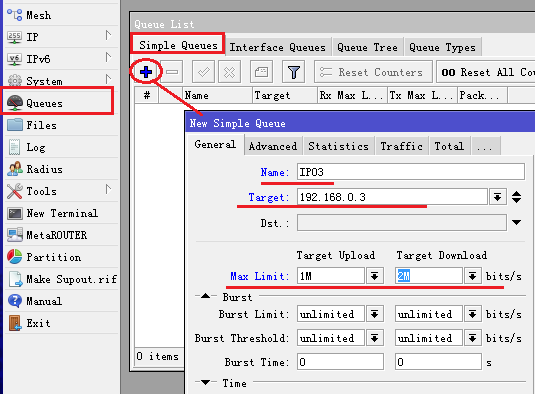
Graphical user interface, application, Word

Description automatically generated

添加完成后:

Graphical user interface

Description automatically generated with low confidence


暂无评论

发送评论 编辑评论


|´・ω・)ノ
ヾ(≧∇≦*)ゝ
(☆ω☆)
(╯‵□′)╯︵┴─┴
 ̄﹃ ̄
(/ω\)
∠( ᐛ 」∠)_
(๑•̀ㅁ•́ฅ)
→_→
୧(๑•̀⌄•́๑)૭
٩(ˊᗜˋ*)و
(ノ°ο°)ノ
(´இ皿இ`)
⌇●﹏●⌇
(ฅ´ω`ฅ)
(╯°A°)╯︵○○○
φ( ̄∇ ̄o)
ヾ(´・ ・`。)ノ"
( ง ᵒ̌皿ᵒ̌)ง⁼³₌₃
(ó﹏ò。)
Σ(っ °Д °;)っ
( ,,´・ω・)ノ"(´っω・`。)
╮(╯▽╰)╭
o(*////▽////*)q
>﹏<
( ๑´•ω•) "(ㆆᴗㆆ)
😂
😀
😅
😊
🙂
🙃
😌
😍
😘
😜
😝
😏
😒
🙄
😳
😡
😔
😫
😱
😭
💩
👻
🙌
🖕
👍
👫
👬
👭
🌚
🌝
🙈
💊
😶
🙏
🍦
🍉
😣
Source: github.com/k4yt3x/flowerhd
颜文字
Emoji
小恐龙
花!
上一篇
下一篇